Rescued Chair: Part 2

Well, after stripping the chair of all of its stuffing and horsehair (an entire trash bag full) I can now recover the chair!

Chair reupholstery project
Lucie seems to prefer the chair naked
The problem with reupholstery projects is that they can be expensive.  The printed duck (that's what they call this fabric-its a combo between upholstery fabric and canvas) is $10 a yard on the low end so make sure you get it on sale (or bring your 40% off coupon) because you're going to want to buy an extra yard or two, especially if you have a pattern you're trying to match.  Since I pulled all the horse hair padding off I also needed additional foam padding for the chair, I recommend the 2 inch thick version of whatever brand you prefer, the 1 inch foam pads just weren't cushy enough.

Reupholstering a Chair
Make sure you sit in it to test it out on your tush. 

Reupholstering a Chair
I added batting to the sides for softness without the thickness. 

I also wouldn't recommend doing this part in stages if you have pets around.  I was trying very hard to avoid upholstering any cat hair into my chair in case it finds a future home somewhere with allergies, but that was difficult with two curious cats wanting to know why Mommy wouldn't let them sit on the new cushy thing.  

Reupholstering a Chair
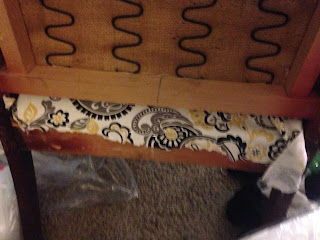
Pulling the seat fabric through to the back
My chair had built in gaps where you could pull the fabric through to the back of the project to staple, this made getting the tight store-bought upholstery look a lot easier.  Don't be afraid to pull it tight, you want this to look like an expert did it.  

If you have a pneumatic stapler this is the time to use it because my hands took a beating trying to tug, pull, tighten, and then press the staple tight each time.  I was using a manual because I was borrowing it so all that was purchased were the staples...but really pneumatic would have been way easier.

The arms were probably the hardest part, I had kept the original fabric off one of the arms and used it as a pattern to try and replicate what the previous owner had done however, even with a template I was unable to create the perfect crisp lines I was looking for.  

Using a Pattern
Save the original upholstery as a pattern-this will make your life much easier. 
Reupholstering a Chair
Adding the side panels

If you're taking apart a chair that's already upholstered I would highly recommend saving the pieces as patterns, this will make your life much easier and hopefully even save fabric.

After adding the arms, I did the back of the chair where you sit and the final piece will be the back of the chair that would face away from the sitter. 

The final step will be adding trim to cover some of the staples and then we will have a finished product!  If you haven't already check out Part 1 of my rescued chair!


Comments

Popular posts from this blog

Shoes

Shoes Shania Twain Tell me about it... Ooh! Men. Have you ever tried to figure them out? Huh, me too, but I ain't got no clue How 'bout you? Men are like shoes Made to confuse Yeah, there's so many of 'em I don't know which ones to choose (yeah, yeah, yeah) Ah, sing it to me If you agree There's the kind made for runnin' The sneakers and the low down heels The kind that will keep you on your toes And every girl knows how that feels (yeah, yeah, yeah) Ouch, ah, sing it with me Chorus: You've got your kickers and your ropers Your everyday loafers, some that you can never find You've got your slippers and your zippers Your grabbers and your grippers Man, don't ya hate that kind? Some you wear in, some you wear out Some you wanna leave behind Sometimes you hate 'em And sometimes you love 'em I guess it all depends on which way you rub 'em But a girl can never have too many of 'em It's amazing what a little polish will do... Men ar...

DIY Wood Stencil Sign

I purchased these cute blank signs from Target--here's what the original item looked like.  The original item Then I created a stencil using 631-this is removable vinyl.  I chose removable vinyl mostly because I had ordered a large number of a color I didn't intend to use again and had extra, also it works great for things like ceramics where you're worried 651 permanent vinyl won't remove easily.  The key for me was USE TRANSFER TAPE.  In the past a majority of my bleeding has been from the centers of the letters because I was individually placing them by hand and they weren't sealing properly.  Transfer tape not only removes me individually placing letter centers, but it also gives you a better seal.  Just take an old credit card and burnish your transfer tape FOREVER.   I had to use two layers of transfer tape cause my roll isn't wide enough.  I mean, burnish until you think there can't possibly be any bubbles under that piece of viny...

Husked Tomato

My Husked Tomato plant I first became acquainted with Husked Tomatoes last year at Wilmington's Tomadah Paradah event.  The plants are more low growing and shrub-like than your ordinary tomato and the fruits are surrounded by husks such as those you would find on a tomatillo.   According to Trade Wind Fruits they are,  "Small orange fruit similar in size and shape to a cherry tomato. The fruit is covered in papery husk. Flavor is a pleasant, unique tomato /pineapple like blend. The ground cherry is very similar to the cape gooseberry, both having similar, but unique flavors." I would definitely agree that they have a unique flavor I wouldn't have said pineapple but reading it that's not a completely inaccurate description.   The fruit In the above picture you can see the husks that form around the fruit.   The fruit are quite a bit smaller than a normal cherry tomato would be (even smaller than most grape tomatoes I think) and are m...